Viewing Surveys on Dashboard
All surveys shared with you will appear under the My Surveys tab on the dashboard of the Meru Data Governance Tool.

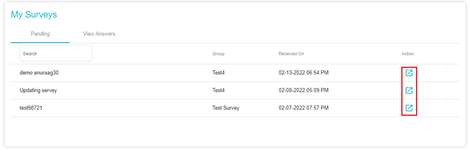
- Pending: All pending surveys will appear under the Pending section of My Surveys
- View Answers: All answered surveys will appear under the View Answers section of My Surveys
- Search: Use the search tab to find a survey from the list
The left most column shows the name of the survey.
- Group: The group to which the survey was distributed
- Received On: The date on which the survey was sent to you
Click the Action button to answer the survey
The answered surveys will appear under the View Answers section

Here, you get the option to view or edit your answers

- Use the
 button to make edits to the answers submitted by you
 - Use the
 button to see the answers you have submitted
- Use the
Adding Notes in Survey
The Notes feature in Survey can be used to add comments/annotations, with the option to label the notes and mention the users in the notes.
Notes can be accessed by following the steps below:
Go to Survey
Select the Survey for which you want to add the notes. Notes can only be added for surveys which have received an answer.
Select the Survey User Group from the drop-down menu
Right click on the survey answer for which you want to add the note
The Notes section shows the options for Filter and New Post
The Filter option allows you to filter the existing Notes based on the following criteria:
- Search Message and comments: Perform search using the keywords in the notes
- Created by: Search for notes created by a user
- Search Category: Search for notes based on their category
- Search Tags: Search for notes based on the Tags added to it
- Filter by Created Time: Search for Notes based on their date of creation, e.g., All, Last 5 Days, Last 10 Days, Last 30 Days.
The Reset Filter option at the bottom of the page allows you to reset the search criteria.
Creating a New Note
Click the New Post button under the Notes section
A new window will appear on the screen with the following options:
The Add a Post field is for adding the comments or annotations that you wish to share with the team.
Tip: You can mention a user in the notes by adding the symbol “@” followed the user’s name. The Note will appear on the user’s Dashboard an they will also receive an email notifying them about the Note along with the link to access the Note.
The Tags option allows you to add tags/labels to a note.
Clicking on the X symbol on the top right corner will close the window and discard the Note
The available categories are:
- Todo (denotes a task to be performed)
- Important (marks the Note as “important”)
- Question (denotes that a question has been posted for the team)
- Idea (denotes that an idea has been posted for the team)
- Critical (denotes that the Note has been labelled as “critical”)
Based on the Tag assigned to the Note, the symbol for that respective category will appear at the bottom of that Note.
For example, here we have created a Note with the comments “Test”, tagged as “Survey”, and the category “Important”, which has been denoted with the symbol for the same.
The Attach option allows you to add an attachment to the Note
After drafting the notes and making the necessary changes, click the Send button to post the Note
Creating a Task
The Survey platform allows you to create and assign tasks to other users.
Add your comments in the “Add a Post” field and mention the email address of the user to whom you want to assign the task
After mentioning the username in the field, you’ll see the option for assigning a task
Click the Task logo and a pop window will open on the screen
You’ll be prompted to provide the following details:
Summary: By default, the comments in the notes will appear as the task summary but you can edit this information.
Workstream: Mention the team or department for which the task has been created
Phase: The Phase represents the quarter of the year. You can choose any of the four phases for the task: Phase 1 (Jan-Mar), Phase 2 (Apr-Jun), Phase 3 (Jul-Sep), and Phase 4 (Oct-Dec).
Priority: You can choose low, medium, or high as the level of priority for the task
Assigned to: By default, the username mentioned in the notes will appear here, but you can edit the users assigned to the task by checking the box against the user name in the list.
Due Date: Specify the due date for the task. Choose the date from the calendar that appears.
Status: Mention the status of the Task as To Do, In Progress, or Completed
After filling in the details for the Task, click Save to save the Task or click Close to discard the information.
After saving the Task, the Note will show the task ID tagged to it.
You can reply to the Note by clicking the Reply option available at the bottom
A new field will appear for you to add your comments, along with the option to assign a category and add an attachment to the Note.
Just like creating a Note, you can assign the category for your reply to the Note
Add an attachment to your reply by clicking the Attachment option and selecting the file to be uploaded
Click the Send button to post the reply
Alternatively, click the X button to close the window and discard the changes
After posting the Note, you’ll see the following options on the Note:
The Archive option performs soft deletion of the Note.
- The Edit button can be used to make changes to the Note
The Delete button can be used to delete the Note